Sometimes they don't have to be fancy, just effective. I recently did a sign for the Best of Seven Barber Shop that does it all "Old School", complete with straight razor cuts, and yes, shoe shines. I felt they needed something that got your attention, but not too over the top. Nothing seems to work together better than some stained wood, a lot of varnish and Gold Leaf, a true winning combination. The nice thing about a sign like this is I get to use my skills in wood working / paint finishing and hand lettering. That's a big change from painting signs that look old and faded for the film industry. Although I didn't have a chance to film me doing the actual work, I did get some pictures of the sign a different stages of completion. When it was finished, I had the added bonus of a client dropping by and liking the look so much they ordered a similar type of sign for the historic building where they work. It's sort of like fishing, put something shiny out there and see what bits.
 The first step once you finished the sign blank is to transfer the layout. I like to use a pounce pattern for this type of sign as it produces a clean layout to follow. Although you could lay it out on the blank, why bother.

Once you have the layout transferred, it's time to get on with applying the size for the Gold Leaf. I don't worry about transferring the outline or drop shadow as I'll eyeball them in after I apply the leaf.

I used a mixture of Rolco quick size, and a bit of One Shot Chrome Yellow for the lettering. Adding a little color helps when doing the lettering so you can see what your doing. The size on it's own can be a little difficult to see as it's transparent. Be careful not to overwork the lettering as it will show up in the finish gild. You don't have to be real precise with the corners when lettering because you can clean them up with the outline. You should also be careful if you have to push back the size, as the gold will want to stick to it.

The first step done, now it's time for the outline and shadow. At this stage you have two directions you can take. One is to brush varnish over the Gold, the second is to leave it and hope you don't screw up with the outline. Getting paint on the leaf is not a good thing as it will leave a stain. I find clearing the leaf kills the brilliance of the gold. But there are many applications where it's necessary, such as in high traffic areas, or on a vehicle that is going to be washed. This sign will be on a wall in the shop, so it should be fine.
 The sign is almost finished at this point. I managed to make it without going into the gold. The only thing left is to permanently attach the trim and add the boarder. Although I could get away without one, I feel it finishes off the sign, just my personal preference. The other thing is to check that you didn't miss any strokes on the outline, like I did on the "N". It may sound basic, but it's easy to do. Better to catch it now instead of when it's installed
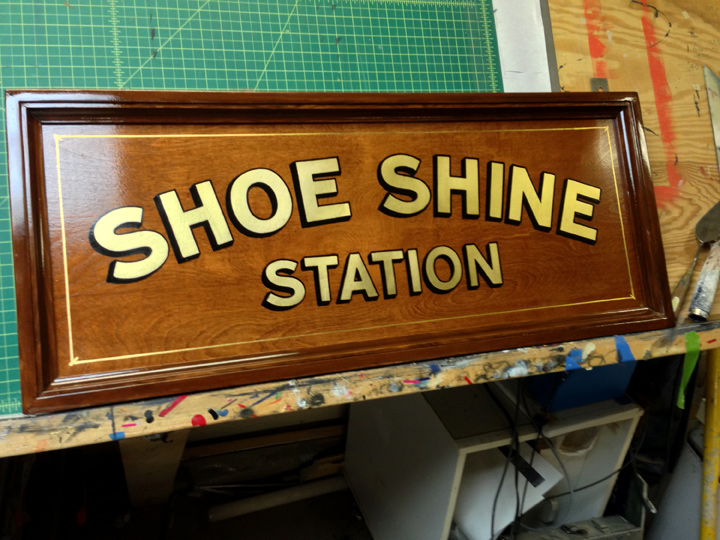
 The finished product. Everything on the sign was hand painted, including the boarder, with no tape or stencils being used in the process. Hope you enjoyed the post. Now it's time to get onto my other projects that are waiting, and I do have some interesting ones on the go. Thanks for dropping by.


Once you have the layout transferred, it's time to get on with applying the size for the Gold Leaf. I don't worry about transferring the outline or drop shadow as I'll eyeball them in after I apply the leaf.

I used a mixture of Rolco quick size, and a bit of One Shot Chrome Yellow for the lettering. Adding a little color helps when doing the lettering so you can see what your doing. The size on it's own can be a little difficult to see as it's transparent. Be careful not to overwork the lettering as it will show up in the finish gild. You don't have to be real precise with the corners when lettering because you can clean them up with the outline. You should also be careful if you have to push back the size, as the gold will want to stick to it.

The first step done, now it's time for the outline and shadow. At this stage you have two directions you can take. One is to brush varnish over the Gold, the second is to leave it and hope you don't screw up with the outline. Getting paint on the leaf is not a good thing as it will leave a stain. I find clearing the leaf kills the brilliance of the gold. But there are many applications where it's necessary, such as in high traffic areas, or on a vehicle that is going to be washed. This sign will be on a wall in the shop, so it should be fine.