Sunday 29 July 2012

Just returned from a road trip

 I just got back from a seven-day bike trip down into the states. Our route took us through a number of small towns in Montana / Idaho / Oregon and Washington. It seemed each town had its own character, mostly due to the architecture and of course, the signs. There were so many different styles and types of signs in these towns, that you could only imagine how many generations of local sign painters had plied their trade to the walls, windows and such over the years. Because I was riding with a group, it was hard to stop and take pictures without falling behind the pack. I think I'll plan a ride by myself, or with someone who also shares my interests, so I can explore and document all the visual eye-candy these little gems of towns have to offer. A lot of the towns seemed to have been founded in the late 1800 or early 1900, so you can imagine the sign work that had been done over the years. I was also surprised to see how many of these small towns seemed to be turning into ghost towns, so many vacant or boarded up shops on their main streets. I'm sure they were bustling little centers in their day, but with the closing of a factory or plant, or the Interstate that was built with no exit to the town, had fallen into despair, and would eventual die. Riding though cottage country and the tourist areas around the many lakes, I couldn't help to notice that a lot of the road side signs were still hand painted, your can tell them by their layouts and flair. I'm sorry I didn't have more time to take pictures, but at least I managed to get a few. If your interested in checking out the bike trip I was on, you can follow the link to: http://pcacanada.blogspot.ca/ to see the trip blog and photos. Thanks for dropping in.


Sunday 8 July 2012

Reproducing other peoples designs

Part of being a sign painter is reproducing other peoples designs, whether a designer, or business owner with the dreaded "nephew art." There's a fine line between trying to be helpful, and or offending a potential client. I've been very fortunate over the years to have worked with excellent designers and business owners who respect my opinion on what works or what doesn't. However, I've also had my fair share of  bad designs, the ones I won't be taking pictures of for the portfolio. I realize as I get older, I might not see the change in trends and taste as much as the youth and markets of  today. But on the other hand, good design is still good design. People come to me because they know regardless of how complicated or how out there their design is; I'll paint it to the best of my ability. If I see something that's not working, I may suggest looking at it a different way. The bottom line is, you're a brush for hire. I know there's no point in complaining about it because it offends my design pride. On the other hand, it doesn't hurt to suggest something to make it a little better. One thing's for sure; if you push to hard, you won't be getting the job. I've made a living painting what people want, not trying to change their minds. With the age of computers, things have become a little more challenging. Designs that are easy to create on a computers, can be very difficult to re-create by hand. What takes a click on the computer, can take hours to paint. The other problem is what looks good in print or on a monitor, may not look the same painted on a wall. The reality is, if you want to make a living painting signs the "Old School" way, you have to work with the client, regardless of the challenges. I just finished a job that was full of challenges, between the wrong clear wood sealer, a logo that challenged my brush skills, having to paint tight lines over 3 1/2' wood planks. Not to mention the weather, either rain or a hot sun with no shade. In the end, the customer was very happy, and the design was faithful to the designers' work. Not to mention I was paid to do what I love doing, painting signs. One of the big perks of this job was the ice cream, they make it from scratch.  Thanks for dropping by.


Monday 2 July 2012

1913 Canadian Pacific Box Car restoration

Recently I started a restoration project on a 1913 railway box car for Heritage Park in Calgary. The project was being done by Brian Manning, who is also the Chief Engineer at the park. With the first part of the job done, I"m now in the process of making the patterns for the remaining lettering. This was a tough one due to the lack of information available for the lettering layout. The problem you run into on jobs such as this is the railway didn't save the shop drawing from 1920 and earlier. The only source of information is from photos, which are also very difficult to find. I have the good fortune to have a friend that is extremely knowledgeable when it comes to railway equipment, not to mention his vast network of historians and collectors. I ended up re-creating the lettering by using a photo as an underlay and then re-creating the lettering in my sign program ( Flexi Sign). By measuring the height and width of the area to be lettered, and also the plank width on the siding, I came up with the layout. From this information, I was able to make a pattern for the graphics. Once the pattern was pounced it was time to go over and hang out at the train barn. There's something relaxing and rewarding about working on these old pieces of history. The stories they could tell, just think, 1913, just imagine what they've seen. Enjoy.


 These are just some of the working photos, I'll post more when I finish. Thanks for dropping in.


It's not paint, but it's close

Just finished a interesting job this week. I was approached to do the lettering on a A1e No. 4-4-0 class locomotive that was in the process of  being restored by CP (Canadian Pacific). It's a static display in front of  the Gulf Canada Square office towers downtown Calgary. At first I was asked to prepare a budget to re-create the layout and then hand letter the engine and tender car. They then also requested I quote the job using vinyl. Not my preferred way to do the job but that's what the client requested. In the end, they decided to use vinyl to due to the budget. A big part of the job was going to be digitizing the lettering and numbers back to the Canadian Pacific lettering specs so they could be cut in vinyl. The engine and tender had been done previously with the wrong font and color (also done with vinyl). With the help of a few close friends, I was supplied with photos and the information  needed to re-create the lettering and numbers. Now it was time to get down to doing the digitizing of the lettering and numbers. There are no digital files available of the font and number that I know of, so it had to be re-created letter by letter. Over the years, I've created quite a collection of patterns and layout for engines / passenger cars/ cabooses and working cars. All of the other restorations jobs I've been involved with were done by hand, both layouts and lettering. This would be the first vinyl job, so a digital file would be needed. The interesting thing is, if done right, it's hard to tell it's vinyl from 20' away, plus your not on site near as long. Here's a few  photos of the #29 back in the day..


Now that I had the lettering and number diagrams, it was time to start digitizing. The first step was to scan the letters and numbers, then create a vector image. I used Adobe Illustrator and Flexi Sign software to do the digitizing  work.

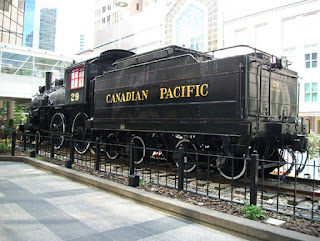
 After spending hours in front of the computer rebuilding the letters and numbers, I had my file. The next step was to cut the vinyl and do the install. Because I was fourtunate to have factory specs for placement and size, it saved time by not having to count the rivets from old photos, which is what I would done on previous jobs. The only thing the specs didn't provide, was the kerning (space between the letters) for the lettering. All they gave me were the overall sizes. Now that that part of the job was over, it was time for the install. With the help of my friend Joe Mattatall, we installed the graphics on the engine and tender. The install took 4 hrs. to complete, not including travel time. It would have been nice to have hand lettered the job, but it all comes down to money, you either accept the customers request, or you don't get the job, plain and simple.. Hope you enjoy the post as much as I enjoyed doing the work. Thanks for taking the time to drop by. Comments are always appreciated. Watch for my next project, I think you'll find it to be quite interesting.